文件管理和IO重定向
内容概述:
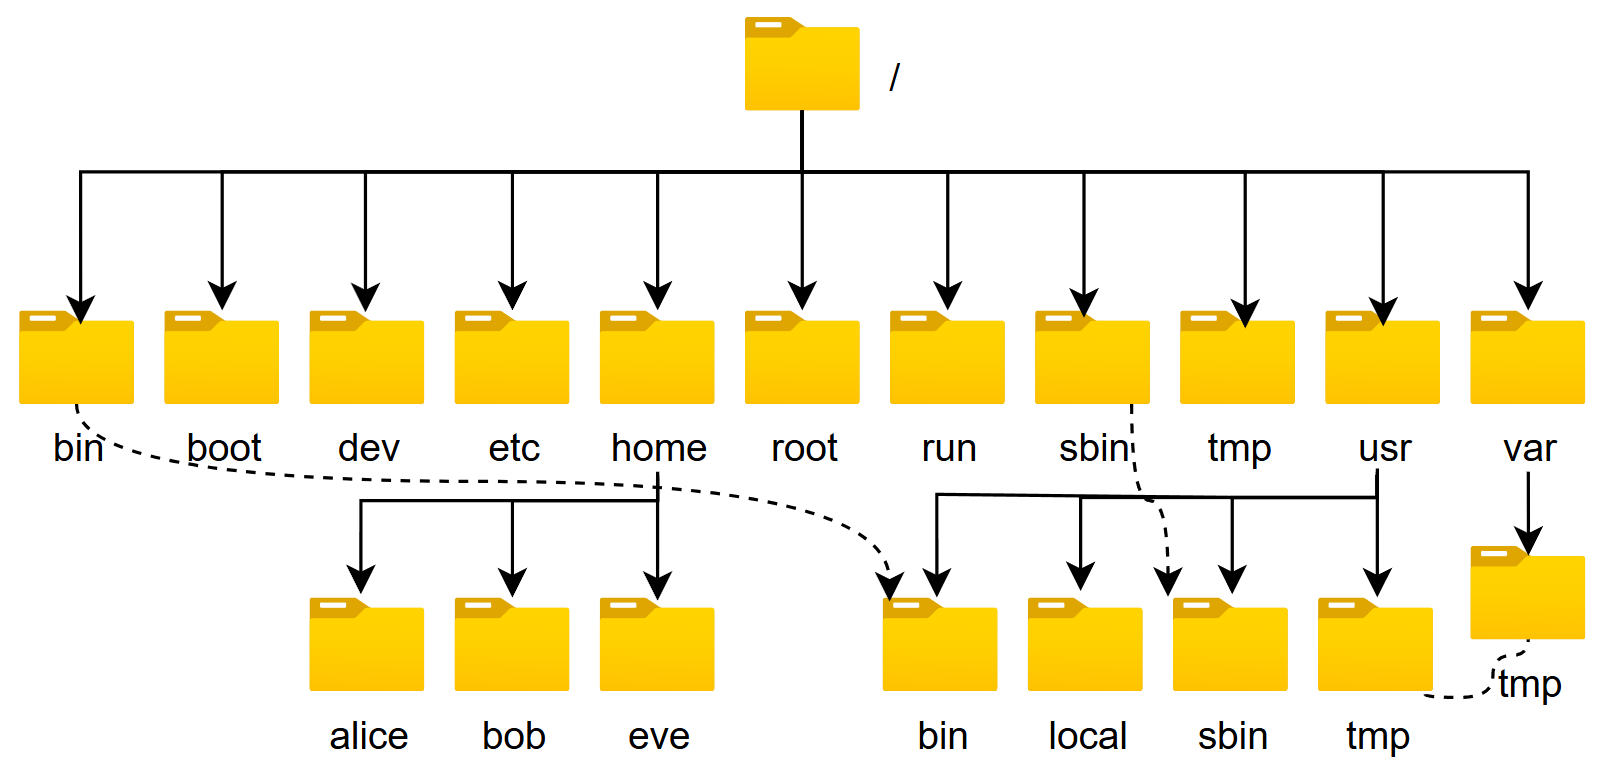
文件系统目录结构
创建和查看文件
复制、转移和删除文件
软和硬链接
IO重定向和管道
文件系统目录结构
文件系统的目录结构 文件和目录被组织成一个单根倒置树结构
文件系统从根目录下开始,用“/”表示
根文件系统(rootfs):root filesystem
标准Linux文件系统(如:ext4),文件名称大小写敏感,例如:MAIL, Mail, mail, mAiL
以 . 开头的文件为隐藏文件
路径分隔的 /
文件名最长255个字节
包括路径在内文件名称最长4095个字节
蓝色-->目录 绿色-->可执行文件 红色-->压缩文件 浅蓝色-->链接文件 灰色-->其他文件
除了斜杠和NUL,所有字符都有效.但使用特殊字符的目录名和文件不推荐使用,有些字符需要用引号来引用
每个文件都有两类相关数据:元数据:metadata,即属性, 数据:data,即文件内容
Linux的文件系统分层结构:FHS Filesystem Hierarchy Standard
常见的文件系统目录功能 /boot:引导文件存放目录,内核文件(vmlinuz)、引导加载器(bootloader, grub)都存放于此目录
/bin:所有用户使用的基本命令;不能关联至独立分区,OS启动即会用到的程序
/sbin:管理类的基本命令;不能关联至独立分区,OS启动即会用到的程序
/lib:启动时程序依赖的基本共享库文件以及内核模块文件(/lib/modules)
/lib64:专用于x86_64系统上的辅助共享库文件存放位置
/etc:配置文件目录
/home/USERNAME:普通用户家目录
/root:管理员的家目录
/media:便携式移动设备挂载点
/mnt:临时文件系统挂载点
/dev:设备文件及特殊文件存储位置
b: block device,随机访问
c: character device,线性访问
/opt:第三方应用程序的安装位置
/srv:系统上运行的服务用到的数据
/tmp:临时文件存储位置
/usr: universal shared, read-only data
bin: 保证系统拥有完整功能而提供的应用程序
sbin:
lib:32位使用
lib64:只存在64位系统
include: C程序的头文件(header files)
share:结构化独立的数据,例如doc, man等
local:第三方应用程序的安装位置
bin, sbin, lib, lib64, etc, share
/var: variable data files
cache: 应用程序缓存数据目录
lib: 应用程序状态信息数据
local:专用于为/usr/local下的应用程序存储可变数据
lock: 锁文件
log: 日志目录及文件
opt: 专用于为/opt下的应用程序存储可变数据
run: 运行中的进程相关数据,通常用于存储进程pid文件
spool: 应用程序数据池
tmp: 保存系统两次重启之间产生的临时数据
/proc: 用于输出内核与进程信息相关的虚拟文件系统
/sys:用于输出当前系统上硬件设备相关信息虚拟文件系统
/selinux: security enhanced Linux,selinux相关的安全策略等信息的存储位置
应用程序的组成部分 二进制程序:/bin, /sbin, /usr/bin, /usr/sbin, /usr/local/bin, /usr/local/sbin
库文件:/lib, /lib64, /usr/lib, /usr/lib64, /usr/local/lib, /usr/local/lib64
配置文件:/etc, /etc/DIRECTORY, /usr/local/etc
帮助文件:/usr/share/man, /usr/share/doc, /usr/local/share/man,
/usr/local/share/doc
Linux下的文件类型
- 普通文件d 目录文件directoryl 符号链接文件linkb 块设备blockc 字符设备characterp 管道文件pipes 套接字文件socket
1
2
3
4
5
[root@centos7 ~]#ls -l /run/ drwxr-xr-x 2 root root 100 Dec 9 20:41 abrt -rw------- 1 root root 11 Dec 9 20:41 alsactl.pid prw------- 1 root root 0 Dec 9 20:41 autofs.fifo-net srw-rw-rw- 1 root root 0 Dec 9 20:41 gssproxy.sock
文件操作命令 显示当前工作目录 每个shell和系统进程都有一个当前的工作目录 CWD:current work directory
显示当前shell CWD的绝对路径
pwd命令: printing working directory
-P 显示真实物理路径
-L 显示链接路径(默认)
绝对和相对路径 绝对路径
以正斜杠/ 即根目录开始
完整的文件的位置路径
可用于任何想指定一个文件名的时候
相对路径名
不以斜线开始
一般情况下,是指相对于当前工作目录的路径,特殊场景下,是相对于某目录的位置
可以作为一个简短的形式指定一个文件名
基名:basename,只取文件名而不要路径
目录名:dirname,只取路径,不要文件名
范例:
1
2
3
4
5
6
7
8
9
10
11
12
13
14
15
16
17
18
19
20
21
22
[root@centos8 bin]#basename /etc/sysconfig/network network [root@centos8 bin]#dirname /etc/sysconfig/network /etc/sysconfig [root@centos8 ~]#dirname /etc/sysconfig/network-scripts/ifcfg-eth0 /etc/sysconfig/network-scripts [root@centos8 ~]#basename /etc/sysconfig/network-scripts/ifcfg-eth0 ifcfg-eth0 [root@ubuntu2004 ~]#basename http://nginx.org/download/nginx-1.18.0.tar.gz nginx-1.18.0.tar.gz [root@ubuntu2004 ~]#basename http://nginx.org/download/nginx-1.18.0.tar.gz .tar.gz nginx-1.18.0 [root@ubuntu2004 ~]#basename -s .tar.gz http://nginx.org/download/nginx- 1.18.0.tar.gz nginx-1.18.0 [root@ubuntu2004 ~]#url=http://nginx.org/download/nginx-1.18.0.tar.gz [root@ubuntu2004 ~]#echo $url http://nginx.org/download/nginx-1.18.0.tar.gz [root@ubuntu2004 ~]#basename $url nginx-1.18.0.tar.gz
更改目录 命令 cd : change directory 改变目录
选项:-P 切换至物理路径,而非软链接目录
可以使用绝对或相对路径
切换至父目录: cd …
切换至当前用户主目录: cd
切换至以前的工作目录: cd -
范例:
1
2
3
4
5
6
7
8
9
10
11
12
[root@centos8 ~]#cd /etc/sysconfig [root@centos8 sysconfig]#pwd /etc/sysconfig [root@centos8 sysconfig]#cd ../../data [root@centos8 data]#pwd /data [root@centos8 data]#cd /bin [root@centos8 bin]#pwd /bin [root@centos8 bin]#cd -P /bin [root@centos8 bin]#pwd /usr/bin
相关的环境变量:
PWD:当前目录路径
OLDPWD:上一次目录路径
范例:
1
2
3
4
5
6
7
[root@centos8 ~]#echo $OLDPWD /etc/sysconfig [root@centos8 ~]#cd - /etc/sysconfig [root@centos8 sysconfig]#pwd /etc/sysconfig [root@centos8 sysconfig]#
列出目录内容 ls 命令可以列出当前目录的内容或指定目录
用法:
1 ls [options] [files_or_dirs]
常见选项:
1
2
3
4
5
6
7
8
9
10
11
12
-a 包含隐藏文件 -l 显示额外的信息 -R 目录递归 -ld 目录和符号链接信息 -1 文件分行显示 -S 按从大到小排序 -t 按mtime排序 -u 配合-t选项,显示并按atime从新到旧排序 -U 按目录存放顺序显示 -X 按文件后缀排序 -F 对不同类型文件显示时附加不同的符号:*/=>@| -C 文件多时,以多列的方式显示文件,默认是一列(标准输出)
ls 查看不同后缀文件时的颜色由 /etc/DIR_COLORS 和@LS_COLORS变量定义
ls -l 看到文件的大小,不一定是实际文件真正占用空间的大小
1
2
3
4
5
6
7
8
9
10
11
12
13
14
15
16
17
18
19
20
21
22
23
[root@centos8 ~]#vim /etc/DIR_COLORS .jpg 01;31 [root@centos8 ~]#exit [root@centos8 ~]#echo $LS_COLORS rs=0:di=01;34:ln =01;36:mh=00:pi=40;33:so=01;35:do =01;35:bd=40;33;01:cd =40;33;01: or=40;31;01:mi=01;05;37;41:su=37;41:sg=30;43:ca=30;41:tw=30;42:ow=34;42:st=37;44 :ex=01;32:*.tar=01;31:*.tgz=01;31:*.arc=01;31:*.arj=01;31:*.taz=01;31:*.lha=01;3 1:*.lz4=01;31:*.lzh=01;31:*.lzma=01;31:*.tlz=01;31:*.txz=01;31:*.tzo=01;31:*.t7z =01;31:*.zip=01;31:*.z=01;31:*.dz=01;31:*.gz=01;31:*.lrz=01;31:*.lz=01;31:*.lzo= 01;31:*.xz=01;31:*.zst=01;31:*.tzst=01;31:*.bz2=01;31:*.bz=01;31:*.tbz=01;31:*.t bz2=01;31:*.tz=01;31:*.deb=01;31:*.rpm=01;31:*.jar=01;31:*.war=01;31:*.ear=01;31 :*.sar=01;31:*.rar=01;31:*.alz=01;31:*.ace=01;31:*.zoo=01;31:*.cpio=01;31:*.7z=0 1;31:*.rz=01;31:*.cab=01;31:*.wim=01;31:*.swm=01;31:*.dwm=01;31:*.esd=01;31:*.jp g=01;31:*.jpeg=01;35:*.mjpg=01;35:*.mjpeg=01;35:*.gif=01;35:*.bmp=01;35:*.pbm=01 ;35:*.pgm=01;35:*.ppm=01;35:*.tga=01;35:*.xbm=01;35:*.xpm=01;35:*.tif=01;35:*.ti ff=01;35:*.png=01;35:*.svg=01;35:*.svgz=01;35:*.mng=01;35:*.pcx=01;35:*.mov=01;3 5:*.mpg=01;35:*.mpeg=01;35:*.m2v=01;35:*.mkv=01;35:*.webm=01;35:*.ogm=01;35:*.mp 4=01;35:*.m4v=01;35:*.mp4v=01;35:*.vob=01;35:*.qt=01;35:*.nuv=01;35:*.wmv=01;35: *.asf=01;35:*.rm =01;35:*.rmvb=01;35:*.flc=01;35:*.avi=01;35:*.fli=01;35:*.flv=01 ;35:*.gl=01;35:*.dl=01;35:*.xcf=01;35:*.xwd=01;35:*.yuv=01;35:*.cgm=01;35:*.emf= 01;35:*.ogv=01;35:*.ogx=01;35:*.aac=01;36:*.au=01;36:*.flac=01;36:*.m4a=01;36:*. mid=01;36:*.midi=01;36:*.mka=01;36:*.mp3=01;36:*.mpc=01;36:*.ogg=01;36:*.ra=01;3 6:*.wav=01;36:*.oga=01;36:*.opus=01;36:*.spx=01;36:*.xspf=01;36:
范例:别名ll
1
2
3
4
[root@centos8 ~]#alias ll alias ll='ls -l --color=auto' [root@ubuntu ~]#alias ll alias ll='ls -alF'
查看文件状态 stat 文件相关信息:metadata, data
每个文件有三个时间戳:
access time 访问时间,atime,读取文件内容
modify time 修改时间,mtime,改变文件内容(数据)
change time 改变时间,ctime,元数据发生改变
1
2
3
4
5
6
7
8
9
[root@centos8 ~]#stat /etc/passwd File: /etc/passwd Size: 1306 Blocks: 8 IO Block: 4096 regular file Device: 802h/2050d Inode: 134792556 Links: 1 Access: (0644/-rw-r--r--) Uid: ( 0/ root) Gid: ( 0/ root) Access: 2019-12-09 20:37:12.830991350 +0800 Modify: 2019-12-09 20:37:12.826991351 +0800 Change: 2019-12-09 20:37:12.826991351 +0800 Birth: -
确定文件内容 文件可以包含多种类型的数据,使用file命令检查文件的类型,然后确定适当的打开命令或应用程序使用
格式:
1 file [options] <filename>...
常用选项:
1
2
3
4
5
-b 列出文件辨识结果时,不显示文件名称 -f filelist 列出文件filelist中文件名的文件类型 -F 使用指定分隔符号替换输出文件名后默认的”:”分隔符 -L 查看对应软链接对应文件的文件类型 --help 显示命令在线帮助
范例:windows的文本格式和Linux的文本格式的区别
1
2
3
4
5
6
7
8
9
10
11
12
13
14
15
16
17
18
19
20
21
22
23
24
25
26
27
28
29
[root@centos8 data]#cat linux.txt a b c [root@centos8 data]#cat win.txt a b c [root@centos8 data]#file win.txt linux.txt win.txt: ASCII text, with CRLF line terminators linux.txt: ASCII text [root@centos8 data]#hexdump -C linux.txt 00000000 61 0a 62 0a 63 0a |a.b.c.| 00000006 [root@centos8 data]#hexdump -C win.txt 00000000 61 0d 0a 62 0d 0a 63 |a..b..c| 00000007 [root@centos8 data]#dnf -y install dos2unix [root@centos8 data]#dos2unix win.txt dos2unix: converting file win.txt to Unix format... [root@centos8 data]#file win.txt win.txt: ASCII text [root@centos8 data]#unix2dos win.txt unix2dos: converting file win.txt to DOS format... [root@centos8 data]#file win.txt win.txt: ASCII text, with CRLF line terminators
范例:转换文件字符集编码
1 2 3 4 5 6 7 8 9 10 11 12 13 14 15 16 17 18 19 20 21 [root@centos8 ~]#iconv -l [root@centos8 data]#file windows.txt windows.txt: ISO-8859 text, with no line terminators [root@centos8 data]#echo $LANG en_US.UTF-8 [root@centos8 data]#cat windows.txt [root@centos8 data]# [root@centos8 data]#iconv -f gb2312 windows.txt -o windows1.txt [root@centos8 data]#cat windows1.txt 马哥教育[root@centos8 data]#ll windows1.txt -rw-r--r-- 1 root root 12 Mar 23 10:13 windows1.txt [root@centos8 data]#file windows1.txt windows1.txt: UTF-8 Unicode text, with no line terminators [root@centos8 data]#iconv -f utf8 -t gb2312 windows1.txt -o windows2.txt [root@centos8 data]#file windows2.txt windows2.txt: ISO-8859 text, with no line terminators
范例:
1
2
3
4
5
6
7
8
9
[15:34:50 root@centos8 ~]#file linux.txt linux.txt: ASCII text [15:34:31 root@centos8 ~]#file windows.txt windows.txt: ASCII text, with CRLF line terminators [15:35:26 root@centos8 ~]#dos2unix windows.txt dos2unix: converting file windows.txt to Unix format... [15:36:00 root@centos8 ~]#file windows.txt windows.txt: ASCII text
范例:
1
2
3
4
5
6
7
8
[root@centos8 ~]#cat list.txt /etc/ /bin /etc/issue [root@centos8 ~]#file -f list.txt /etc/: directory /bin: symbolic link to usr/bin /etc/issue: ASCII text
🌟文件通配符模式wildcard pattern
文件通配符可以用来匹配符合条件的多个文件,方便批量管理文件
通配符采有特定的符号,表示特定的含义,此特符号称为元 meta 字符
常见的通配符如下:
1
2
3
4
5
6
7
8
9
10
11
12
* 匹配零个或多个字符,但不匹配 "." 开头的文件,即隐藏文件 ? 匹配任何单个字符,一个汉字也算一个字符 ~ 当前用户家目录 ~mage 用户mage家目录 [0-9] 匹配数字范围 [a-z] 一个字母 [A-Z] 一个字母 [wang] 匹配列表中的任何的一个字符 [^wang] 匹配列表中的所有字符以外的字符 [^a-z] 匹配列表中的所有字符以外的字符 . 和 ~+ 当前工作目录 ~- 前一个工作目录
另外还有在Linux系统中预定义的字符类表示法如下:man 7 glob
1
2
3
4
5
6
7
8
9
10
11
12
[:digit:]:任意数字,相当于0-9 [:lower:]:任意小写字母,表示 a-z [:upper:]: 任意大写字母,表示 A-Z [:alpha:]: 任意大小写字母 [:alnum:]:任意数字或字母 [:blank:]:水平空白字符 [:space:]:水平或垂直空白字符 [:punct:]:标点符号 [:print :]:可打印字符 [:cntrl:]:控制(非打印)字符 [:graph:]:图形字符 [:xdigit:]:十六进制字符
范例: [ ] 和 { }
1
2
3
4
5
6
7
8
9
10
11
12
13
14
15
16
17
18
19
20
[root@centos8 data]#ll f{1..5} ls : cannot access 'f1' : No such file or directoryls : cannot access 'f2' : No such file or directory-rw-r--r-- 1 root root 0 Nov 7 09:34 f3 -rw-r--r-- 1 root root 0 Nov 7 09:34 f4 -rw-r--r-- 1 root root 0 Nov 7 09:34 f5 [root@centos8 data]#ll f[1-5] -rw-r--r-- 1 root root 0 Nov 7 09:34 f3 -rw-r--r-- 1 root root 0 Nov 7 09:34 f4 -rw-r--r-- 1 root root 0 Nov 7 09:34 f5 [root@centos8 data]#ll f[a-c] -rw-r--r-- 1 root root 0 Nov 7 09:46 fa -rw-r--r-- 1 root root 0 Nov 7 09:46 fA -rw-r--r-- 1 root root 0 Nov 7 09:46 fb -rw-r--r-- 1 root root 0 Nov 7 09:46 fB -rw-r--r-- 1 root root 0 Nov 7 09:46 fc [root@centos8 data]#ll f{a..c} -rw-r--r-- 1 root root 0 Nov 7 09:46 fa -rw-r--r-- 1 root root 0 Nov 7 09:46 fb -rw-r--r-- 1 root root 0 Nov 7 09:46 fc
范例:
1
2
3
4
5
6
7
8
9
10
11
12
13
14
15
16
17
18
19
20
21
22
23
24
25
26
27
28
29
30
[root@centos8 data]#touch file{a..z}.txt file{A..Z}.txt file{0..9}.txt [root@centos8 data]#ll file{0..9}.txt -rw-r--r-- 1 root root 0 Mar 23 10:46 file0.txt -rw-r--r-- 1 root root 0 Mar 23 10:46 file1.txt -rw-r--r-- 1 root root 0 Mar 23 10:46 file2.txt -rw-r--r-- 1 root root 0 Mar 23 10:46 file3.txt -rw-r--r-- 1 root root 0 Mar 23 10:46 file4.txt -rw-r--r-- 1 root root 0 Mar 23 10:46 file5.txt -rw-r--r-- 1 root root 0 Mar 23 10:46 file6.txt -rw-r--r-- 1 root root 0 Mar 23 10:46 file7.txt -rw-r--r-- 1 root root 0 Mar 23 10:46 file8.txt -rw-r--r-- 1 root root 0 Mar 23 10:46 file9.txt [root@centos8 data]#ll file[0-9].txt -rw-r--r-- 1 root root 0 Mar 23 10:46 file0.txt -rw-r--r-- 1 root root 0 Mar 23 10:46 file1.txt -rw-r--r-- 1 root root 0 Mar 23 10:46 file2.txt -rw-r--r-- 1 root root 0 Mar 23 10:46 file3.txt -rw-r--r-- 1 root root 0 Mar 23 10:46 file4.txt -rw-r--r-- 1 root root 0 Mar 23 10:46 file5.txt -rw-r--r-- 1 root root 0 Mar 23 10:46 file6.txt -rw-r--r-- 1 root root 0 Mar 23 10:46 file7.txt -rw-r--r-- 1 root root 0 Mar 23 10:46 file8.txt -rw-r--r-- 1 root root 0 Mar 23 10:46 file9.txt [root@centos8 data]#ls file[a-c].txt filea.txt fileA.txt fileb.txt fileB.txt filec.txt [root@centos8 data]#ls file[C-E].txt fileC.txt filed.txt fileD.txt filee.txt fileE.txt [root@centos8 data]#ls file[wang].txt filea.txt fileg.txt filen.txt filew.txt [root@centos8 data]#ls file[^wang].txt
范例:
1
2
3
4
5
6
7
8
9
[root@centos8 data]#ls file[:lower:].txt filee.txt filel.txt fileo.txt filer.txt filew.txt [root@centos8 data]#ls file[[:lower:]].txt filea.txt filed.txt fileg.txt filej.txt filem.txt filep.txt files.txt filev.txt filey.txt fileb.txt filee.txt fileh.txt filek.txt filen.txt fileq.txt filet.txt filew.txt filez.txt filec.txt filef.txt filei.txt filel.txt fileo.txt filer.txt fileu.txt filex.txt
范例:比较有无*的功能区别
1
2
[root@centos8 data]#ls -a * [root@centos8 data]#ls -a
范例:
1
2
[root@centos8 ~]#ls -d /etc/*/ [root@centos8 ~]#l.
范例:
1
2
3
4
5
6
7
[root@centos8 data]#touch file*.log [root@centos8 data]#touch file1.log [root@centos8 data]#ls file*.log file1.log 'file*.log' [root@centos8 data]#ls 'file*.log' 'file*.log' [root@centos8 data]#ls 'file*.log'
练习
1、显示/etc目录下所有以l开头,以一个小写字母结尾,且中间出现至少一位数字的文件或目录列表
1
2
3
4
[root@192 ~]# ls -d /etc/l*[0-9]*[a-z] /etc/l123df21a [root@192 ~]# ls -d /etc/l*[0-9]*[[:lower:]] /etc/l123se123a
2、显示/etc目录下以任意一位数字开头,且以非数字结尾的文件或目录列表
1
2
[root@192 ~]# ls /etc/[0-9]*[^0-9] -d /etc/1aa
3、显示/etc/目录下以非字母开头,后面跟了一个字母及其它任意长度任意字符的文件或目录列表
1
2
[root@192 ~]# ll -d /etc/[^[:alpha:]][[:alpha:]]* drwxr-xr-x 2 root root 4096 Jul 2 14:24 /etc/1aa
4、显示/etc/目录下所有以rc开头,并后面是0-6之间的数字,其它为任意字符的文件或目录列表
1
2
[root@192 ~]# ls /etc/rc[0-6]* -d /etc/rc0.d /etc/rc1.d /etc/rc2.d /etc/rc3.d /etc/rc4.d /etc/rc5.d /etc/rc6.d
5、显示/etc目录下,所有.conf结尾,且以m,n,r,p开头的文件或目录列表
1
2
3
[root@192 ~]# ls /etc/[m,n,r,p]*.conf /etc/man_db.conf /etc/nfs.conf /etc/nsswitch.conf /etc/resolv.conf /etc/rsyslog.conf /etc/mke2fs.conf /etc/nfsmount.conf /etc/request-key.conf /etc/rsyncd.conf
6、只显示/root下的隐藏文件和目录列表
1
2
3
4
5
6
7
8
9
10
11
12
13
14
15
16
17
18
[root@192 ~]# ll -a .* -rw-------. 1 root root 1110 Dec 8 2024 .bash_history -rw-r--r--. 1 root root 18 May 10 2024 .bash_logout -rw-r--r--. 1 root root 176 May 10 2024 .bash_profile -rw-r--r--. 1 root root 176 May 10 2024 .bashrc -rw-r--r--. 1 root root 100 May 10 2024 .cshrc -rw-r--r--. 1 root root 129 May 10 2024 .tcshrc -rw-------. 1 root root 2646 Dec 8 2024 .viminfo .cache: total 8 drwx------ 2 root root 4096 Dec 8 2024 . dr-xr-x---. 4 root root 4096 Dec 8 2024 .. .ssh: total 8 drwx------. 2 root root 4096 Dec 8 2024 . dr-xr-x---. 4 root root 4096 Dec 8 2024 ..
7、只显示/etc下的非隐藏目录列表
1
2
3
4
5
6
7
[root@192 ~]# ls -d /etc/[^.]* /etc/1aa /etc/ipset /etc/protocols /etc/adjtime /etc/iscsi /etc/quotagrpadmins /etc/aliases /etc/isns /etc/quotatab /etc/alternatives /etc/issue /etc/rc0.d /etc/anacrontab /etc/issue.d /etc/rc1.d ......
创建空文件和刷新时间 touch命令可以用来创建空文件或刷新文件的时间
1
2
3
4
-a 仅改变 atime和ctime -m 仅改变 mtime和ctime -t [[CC]YY]MMDDhhmm[.ss] 指定atime和mtime的时间戳 -c 如果文件不存在,则不予创建
范例
1
2
3
4
5
6
7
8
9
10
11
12
13
14
15
16
17
18
19
20
21
22
23
24
25
26
[root@centos8 data]#touch f1.txt [root@centos8 data]#ll total 0 -rw-r--r-- 1 root root 0 Mar 23 11:30 f1.txt [root@centos8 data]#ll /etc/issue -rw-r--r--. 1 root root 23 Jan 2 23:21 /etc/issue [root@centos8 data]#touch /etc/issue [root@centos8 data]#ll /etc/issue -rw-r--r--. 1 root root 23 Mar 23 11:31 /etc/issue [root@centos8 data]#stat /etc/issue File: /etc/issue Size: 23 Blocks: 8 IO Block: 4096 regular file Device: 802h/2050d Inode: 134345998 Links: 1 Access: (0644/-rw-r--r--) Uid: ( 0/ root) Gid: ( 0/ root) Access: 2020-03-23 11:31:20.030291332 +0800 Modify: 2020-03-23 11:31:20.030291332 +0800 Change: 2020-03-23 11:31:20.030291332 +0800 Birth: - [root@centos8 data]#date Fri Dec 13 16:11:55 CST 2019 [root@centos8 data]#touch `date -d "-1 day" +%F_%T`.log [root@centos8 data]#ls 2019-12-12_16:11:48.log [root@centos8 data]#touch $(date -d "1 year" +%F_%T).log [root@centos8 data]#ls 2019-12-12_16:11:48.log 2020-12-13_16:13:11.log
复制文件和目录 利用 cp(copy)命令可以实现文件或目录的复制
格式
1
2
3
cp [OPTION]... [-T] SOURCE DESTcp [OPTION]... SOURCE... DIRECTORYcp [OPTION]... -t DIRECTORY SOURCE...
常用选项
1
2
3
4
5
6
7
8
9
10
11
12
13
14
15
16
17
18
19
20
-i 如果目标已存在,覆盖前提示是否覆盖 -n 不覆盖,注意两者顺序 -r, -R 递归复制目录及内部的所有内容 -a 归档,相当于-dR --preserv=all,常用于备份功能 -d --no-dereference --preserv=links 不复制原文件,只复制链接名 --preserv[=ATTR_LIST mode: 权限 ownership: 属主属组 timestamp: links xattr context all -p 等同--preserv=mode,ownership,timestamp -v --verbose -f --force -u --update 只复制源比目标更新文件或目标不存在的文件 -b 目标存在,覆盖前先备份,默认形式为 filename~ ,只保留最近的一个备份 --backup=numbered 目标存在,覆盖前先备份加数字后缀,形式为 filename.~#~ ,可以保留多 个版本
源 \ 目标
不存在
存在且为文件
存在且为目录
一个文件
新建DEST,并将SRC中的内容填充至DEST中
将SRC中的内容覆盖至DEST中,注意数据丢失风险!建议用 -i 选项
在DEST下新建与原文件同名的文件,并将SRC中内容填充至新文件中
多个文件
提示错误
提示错误
在DEST下新建与原文件同名的文件,并将原文件内容复制进新文件中
目录(须使用 -r 选项)
创建指定DEST同名目录,复制SRC目录中所有文件至DEST下
提示错误
在DEST下新建与原目录同名的目录,并将SRC中内容复制至新目录中
范例:
1
2
3
4
5
6
7
8
9
10
11
12
13
14
15
16
17
18
19
20
21
22
23
24
25
26
27
28
29
30
31
32
33
34
35
[16:21:08 root@centos8 ~]#cp ~wang/issue /data/issue_wang.bak -rw-r--r--. 1 root root 86 Dec 13 16:21 /data/issue_wang.bak -rw-r--r--. 1 wang wang 86 Dec 13 16:18 /home/wang/issue [16:21:44 root@centos8 ~]#cp -p ~wang/issue /data/issue_wang2.bak [16:22:07 root@centos8 ~]#ll ~wang/issue /data/issue_wang2.bak -rw-r--r--. 1 wang wang 86 Dec 13 16:18 /data/issue_wang2.bak -rw-r--r--. 1 wang wang 86 Dec 13 16:18 /home/wang/issue [16:23:19 root@centos8 ~]#cp /etc/sysconfig/ /data/ cp : -r not specified; omitting directory '/etc/sysconfig/' [16:23:40 root@centos8 ~]#cp -r /etc/sysconfig/ /data/ [16:23:45 root@centos8 ~]#ll /data total 12 -rw-r--r--. 1 root root 0 Dec 13 16:11 2019-12-12_16:11:48.log -rw-r--r--. 1 root root 0 Dec 13 16:13 2020-12-13_16:13:11.log -rw-r--r--. 1 wang wang 86 Dec 13 16:18 issue_wang2.bak -rw-r--r--. 1 root root 86 Dec 13 16:21 issue_wang.bak drwxr-xr-x. 7 root root 4096 Dec 13 16:23 sysconfig [16:24:03 root@centos8 ~]#cp -r /etc/sysconfig/ /data/sysconfig_bak [16:24:34 root@centos8 ~]#ll /data total 16 -rw-r--r--. 1 root root 0 Dec 13 16:11 2019-12-12_16:11:48.log -rw-r--r--. 1 root root 0 Dec 13 16:13 2020-12-13_16:13:11.log -rw-r--r--. 1 wang wang 86 Dec 13 16:18 issue_wang2.bak -rw-r--r--. 1 root root 86 Dec 13 16:21 issue_wang.bak drwxr-xr-x. 7 root root 4096 Dec 13 16:23 sysconfig drwxr-xr-x. 7 root root 4096 Dec 13 16:24 sysconfig_bak [root@192 ~]# cp /etc/yum.repos.d/openEuler.repo{,.bak} [root@192 ~]# ll /etc/yum.repos.d/ total 8 -rw-r--r--. 1 root root 2095 Dec 8 2024 openEuler.repo -rw-r--r-- 1 root root 2095 Jul 2 14:53 openEuler.repo.bak [root@192 ~]#
范例:复制时如果覆盖先备份再覆盖
1
2
3
4
5
6
7
8
9
10
11
12
13
14
15
16
17
18
19
20
21
22
23
24
25
[16:32:43 root@centos8 ~]#cp -b /etc/motd /data/issue cp : overwrite '/data/issue' ? y [16:33:09 root@centos8 ~]#ll /data total 8 -rw-r--r--. 1 root root 1 Dec 13 16:33 issue -rw-r--r--. 1 root root 2610 Dec 13 16:32 issue~ [16:33:11 root@centos8 ~]#cp -b /etc/fstab /data/issue cp : overwrite '/data/issue' ? y[16:33:55 root@centos8 ~]#ll /data total 8 -rw-r--r--. 1 root root 709 Dec 13 16:33 issue -rw-r--r--. 1 root root 1 Dec 13 16:33 issue~ [16:33:56 root@centos8 ~]#cp --backup=numbered /etc/fstab /data/issue cp : overwrite '/data/issue' ? y[16:34:32 root@centos8 ~]#cp --backup=numbered /etc/shadow /data/issue cp : overwrite '/data/issue' ? y[16:34:41 root@centos8 ~]#cp --backup=numbered /etc/os-release /data/issue cp : overwrite '/data/issue' ? y[16:34:48 root@centos8 ~]#ll /data total 20 -rw-r--r--. 1 root root 420 Dec 13 16:34 issue -rw-r--r--. 1 root root 1 Dec 13 16:33 issue~ -rw-r--r--. 1 root root 709 Dec 13 16:33 issue.~1~ -rw-r--r--. 1 root root 709 Dec 13 16:34 issue.~2~ ----------. 1 root root 1349 Dec 13 16:34 issue.~3~
范例:
1 [root@centos8 ~]#cp /dev/zero /data/zero.bak
练习
1、每天将/etc/目录下所有文件,备份到/data独立的子目录下,并要求子目录格式为 backupYYYYmm-dd,备份过程可见
1
2
[root@centos8 ~]#cp -av /etc/ /data/backup`date +%F` [root@centos8 ~]#cp -av /etc/ /data/etc-`date +%F_%H-%M-%S
2、创建/data/rootdir目录,并复制/root下所有文件到该目录内,要求保留原有权限
1 [root@centos8 ~]#cp -a /root /data/rootdir
移动和重命名文件 mv 命令可以实现文件或目录的移动和改名
同一分区移动数据,速度很快:数据位置没有变化
不同分区移动数据,速度相对慢:数据位置发生了变化
格式:
1
2
3
mv [OPTION]... [-T] SOURCE DESTmv [OPTION]... SOURCE... DIRECTORYmv [OPTION]... -t DIRECTORY SOURCE...
常用选项:
-i 交互式
-f 强制
-b 目标存在,覆盖前先备份
利用 rename 可以批量修改文件名
格式:
1 rename [options] <expression> <replacement> <file>...
范例:
1 2 3 4 rename 'conf' 'conf.bak' f* rename '.bak' '' *.bak
删除文件
使用 rm 命令可以删除文件和目录
注意:此命令非常危险,慎重使用,建议使用 mv 代替 rm
格式:
常用选项:
1
2
3
4
-i 交互式 -f 强制删除 -r 递归 --no-preserve-root 删除/
范例:
1
2
3
4
5
6
7
[root@centos8 ~]#rm -rf / rm : it is dangerous to operate recursively on '/' rm : use --no-preserve-root to override this failsafe[root@centos8 ~]#rm -rf /* [root@centos8 ~]#/2TAB [root@centos8 ~]#echo *
范例: rm 别名
1 [root@centos8 ~]#alias rm ="echo 请使用mv"
范例:删除特殊文件
1
2
3
4
5
6
7
8
9
10
[root@centos8 data]#rm ./-f [root@centos8 data]#rm /data/-f [root@centos8 data]#touch '~' [root@centos8 data]#ls '~' [root@centos8 data]#rm -f ~ rm : cannot remove '/root' : Is a directory[root@centos8 data]#rm -- ~ rm : cannot remove '/root' : Is a directory[root@centos8 data]#rm -f ./~
rm 虽然删除了文件,但是被删除的文件仍然可能被恢复,在安全要求较高的场景下,可以使用shred安
全删除文件
目录操作 显示目录树 tree
常见选项:
-d: 只显示目录
-L level:指定显示的层级数目
-P pattern: 只显示由指定wild-card pattern匹配到的路径
创建目录 mkdir
常见选项:
-p: 存在于不报错,且可自动创建所需的各目录
-v: 显示详细信息
-m MODE: 创建目录时直接指定权限
删除空目录 rmdir
常见选项:
-p 递归删除父空目录
-v 显示详细信息
注意:rmdir只能删除空目录,如果想删除非空目录,可以使用rm -r 命令,递归删除目录树
范例
1 alias rm ='DIR=/data/backup`date +%F%T`;mkdir $DIR;mv -t $DIR'
练习
(1) 如何创建/testdir/dir1/x, /testdir/dir1/y, /testdir/dir1/x/a, /testdir/dir1/x/b, /testdir/dir1/y/a, /testdir/dir1/y/b
1
2
3
4
5
6
7
8
9
10
11
12
13
mkdir -p /testdir/dir1/{x,y}/{a,b}[root@192 ~]# ll /testdir/dir1/{x,y} /testdir/dir1/x: total 8 drwxr-xr-x 2 root root 4096 Jul 2 15:08 a drwxr-xr-x 2 root root 4096 Jul 2 15:08 b /testdir/dir1/y: total 8 drwxr-xr-x 2 root root 4096 Jul 2 15:08 a drwxr-xr-x 2 root root 4096 Jul 2 15:08 b [root@192 ~]#
(2) 如何创建/testdir/dir2/x, /testdir/dir2/y, /testdir/dir2/x/a, /testdir/dir2/x/b
1
2
3
4
5
6
7
8
9
[root@192 ~]# mkdir -p /testdir/dir2/{x,y} /testdir/dir2/x/{a,b} [root@192 ~]# ll /testdir/dir2/{x,y} /testdir/dir2/x: total 8 drwxr-xr-x 2 root root 4096 Jul 2 15:09 a drwxr-xr-x 2 root root 4096 Jul 2 15:09 b /testdir/dir2/y: total 0
(3) 如何创建/testdir/dir3, /testdir/dir4, /testdir/dir5, /testdir/dir5/dir6, /testdir/dir5/dir7
1
2
3
4
5
6
7
8
9
10
11
12
13
[root@192 ~]# mkdir -p /testdir/dir{3,4,5} /testdir/dir5/dir{6,7} [root@192 ~]# ll /testdir/dir{3,4,5} /testdir/dir3: total 0 /testdir/dir4: total 0 /testdir/dir5: total 8 drwxr-xr-x 2 root root 4096 Jul 2 15:11 dir6 drwxr-xr-x 2 root root 4096 Jul 2 15:11 dir7 [root@192 ~]#
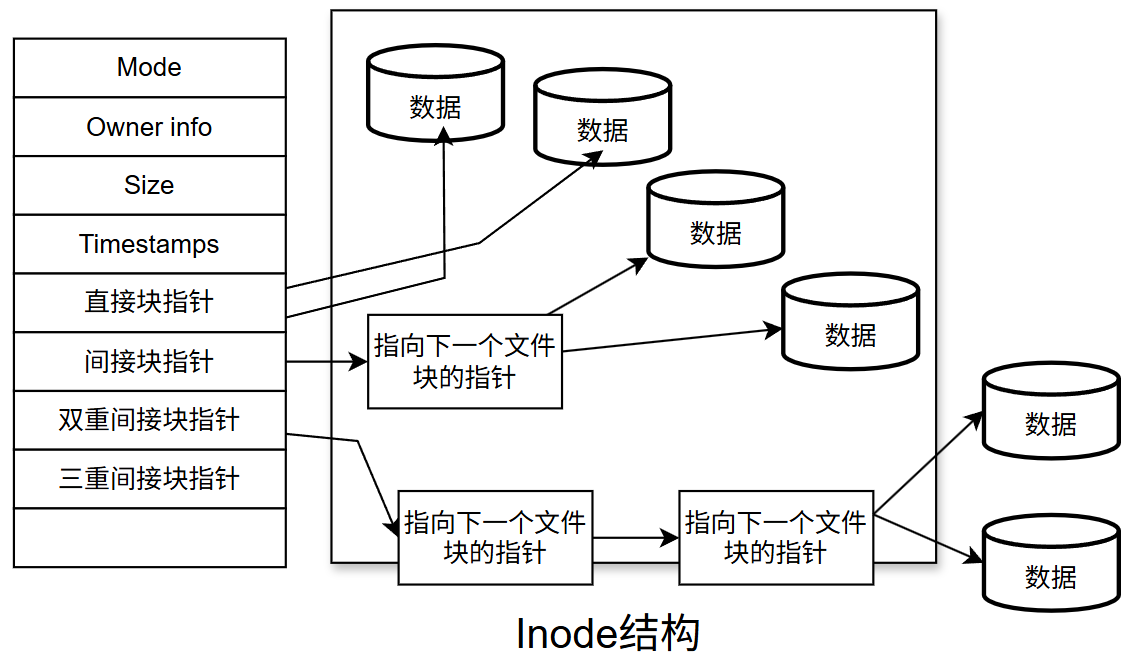
文件元数据和节点表结构 inode 表结构 据是存放在inode(index node)表中。inode 表中有很多条记录组成,第一条记录对应的存放了一个
文件的元数据信息
每一个inode表记录对应的保存了以下信息:
1
2
3
4
5
6
7
8
9
inode number 节点号 文件类型 权限 UID GID 链接数(指向这个文件名路径名称个数) 该文件的大小和不同的时间戳 指向磁盘上文件的数据块指针 有关文件的其他数据
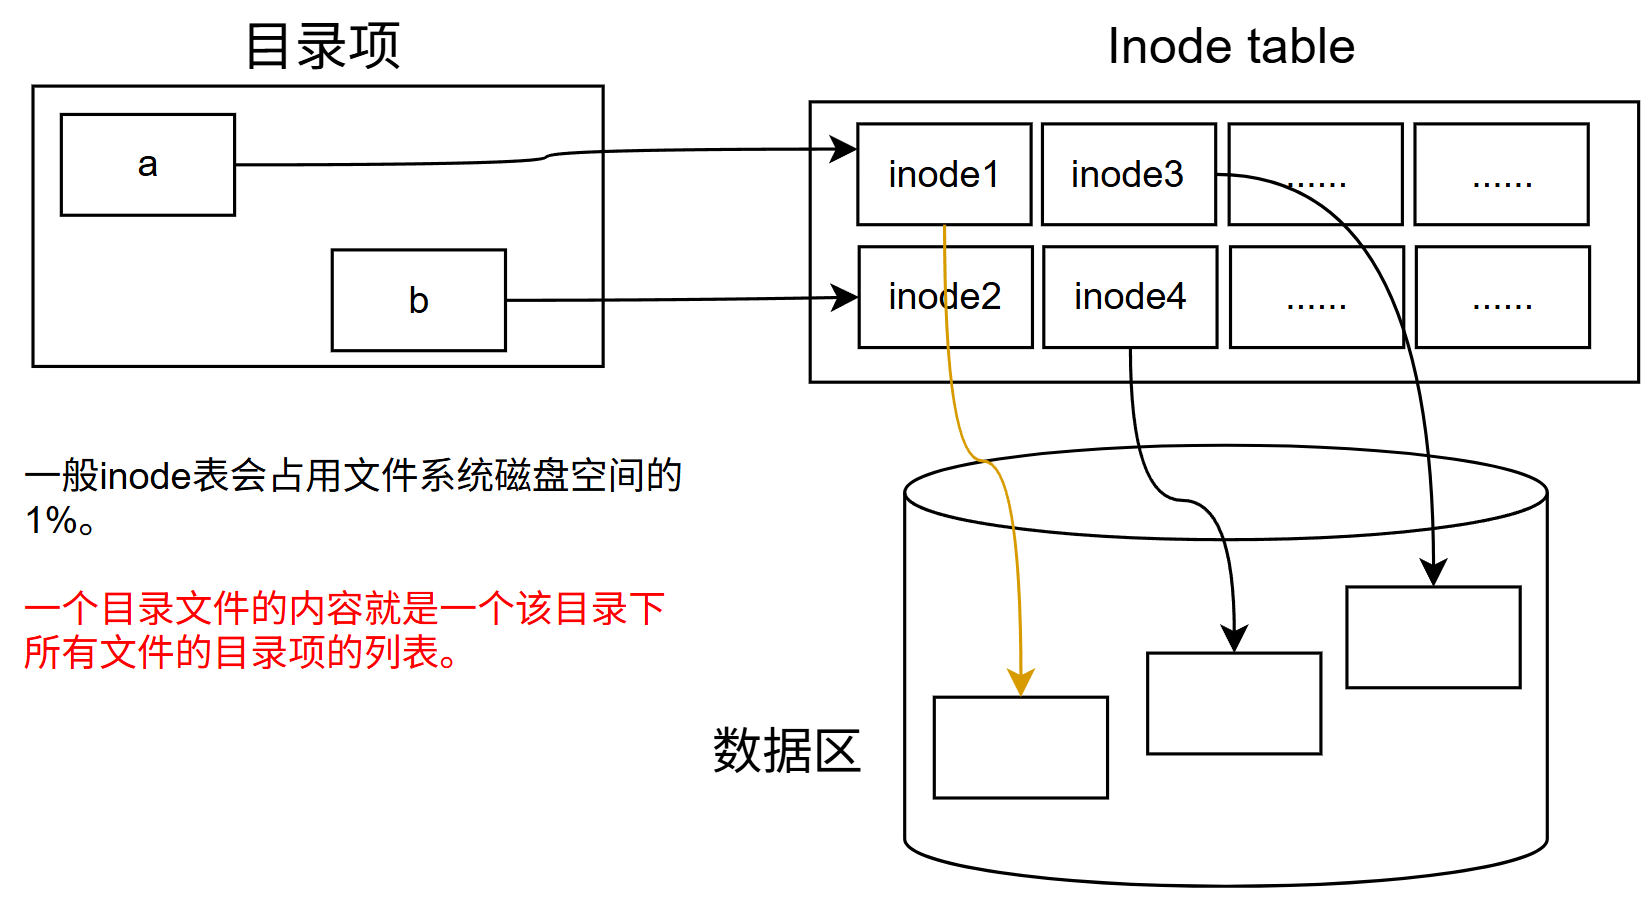
目录
目录是个特殊文件,目录文件的内容保存了此目录中文件的列表及inode number对应关系
文件引用一个是 inode号
人是通过文件名来引用一个文件
一个目录是目录下的文件名和文件inode号之间的映射
inode表和目录
cp和inode
cp 命令:
分配一个空闲的inode号,在inode表中生成新条目
在目录中创建一个目录项,将名称与inode编号关联
拷贝数据生成新的文件
rm和inode
rm 命令:
链接数递减,从而释放的inode号可以被重用
把数据块放在空闲列表中
删除目录项
数据实际上不会马上被删除,但当另一个文件使用数据块时将被覆盖
mv和inode
如果mv命令的目标和源在相同的文件系统,作为mv 命令
用新的文件名创建对应新的目录项
删除旧目录条目对应的旧的文件名
不影响inode表(除时间戳)或磁盘上的数据位置:没有数据被移动!
如果目标和源在一个不同的文件系统, mv相当于cp和rm
范例:
1
2
3
4
5
6
7
8
9
10
11
12
13
[root@centos8 ~]#df -i /boot Filesystem Inodes IUsed IFree IUse% Mounted on /dev/sda1 65536 310 65226 1% /boot [root@centos8 ~]#mkdir /boot/test [root@centos8 ~]#touch /boot/test/file{1..65226} [root@centos8 ~]#touch /boot/test/new.txt touch : cannot touch 'new.txt' : No space left on device[root@centos8 ~]#df /boot Filesystem 1K-blocks Used Available Use% Mounted on /dev/sda1 999320 133800 796708 15% /boot [root@centos8 ~]#df -i /boot Filesystem Inodes IUsed IFree IUse% Mounted on /dev/sda1 65536 65536 0 100% /boot
范例:删除大文件
1 [root@centos8 ~]#cat /dev/null > /var/log/huge.log
硬(hard)链接
硬链接本质上就给一个文件起一个新的名称,实质是同一个文件
硬链接特性
1
2
3
4
5
6
7
创建硬链接会在对应的目录中增加额外的记录项以引用文件 对应于同一文件系统上一个物理文件 每个目录引用相同的inode号 创建时链接数递增 删除文件时:rm 命令递减计数的链接,文件要存在,至少有一个链接数,当链接数为零时,该文件被删除 不能跨越驱动器或分区 不支持对目录创建硬链接
格式:
符号 symbolic (或软 soft)链接
一个符号链接指向另一个文件,就像 windows 中快捷方式,软链接文件和原文件本质上不是同一个文件
软链接特点
1
2
3
4
5
一个符号链接的内容是它引用文件的名称 可以对目录创建软链接 可以跨分区的文件实现 指向的是另一个文件的路径;其大小为指向的路径字符串的长度;不增加或减少目标文件inode的引用计数 在创建软链接时, 如果源文件使用相对路径,是相对于软链接文件的路径,而非相对于当前工作目录,但是软链接的路径如果是相对路径,则是相对于当前工作目录
格式:
1 ln -s filename [linkname]
范例: 查看软链接
1
2
3
4
5
6
7
8
[root@ubuntu1804 ~]#ll /bin/sh lrwxrwxrwx 1 root root 4 Nov 1 02:16 /bin/sh -> dash* root@ubuntu2004:~# ll /bin/sh lrwxrwxrwx 1 root root 4 Apr 23 2020 /bin/sh -> dash* [root@centos8 ~]#ll /bin/sh lrwxrwxrwx. 1 root root 4 Jul 22 2020 /bin/sh -> bash [root@centos7 ~]#ll /bin/sh lrwxrwxrwx. 1 root root 4 Mar 14 10:46 /bin/sh -> bash
范例:
1 2 3 4 5 6 7 8 9 ln -s /data/dir /data/dirlinkcd /dataln -s ../data/dir /root/dirlinkreadlink /data/dirlink[root@centos8 ~]#readlink /proc/$$/exe /usr/bin/bash
范例: 删除软链接时姿势不对造成的生产事故
1
2
3
m -rf /data/dirlink rm -rf /data/dirlink/
🌟硬链接和软链接区别总结
1
2
3
4
5
6
7
8
9
10
11
12
13
14
15
16
17
18
19
20
21
22
23
24
25
26
27
1. 本质: 硬链接:本质是同一个文件 软链接:本质不是同一个文件 2. 跨设备 硬链接:不支持 软链接:支持 3. inode 硬链接:相同 软链接:不同 4. 链接数 硬链接:创建新的硬链接,链接数会增加,删除硬链接,链接数减少 软链接:创建或删除,链接数不会变化 5. 文件夹 硬链接:不支持 软链接:支持 6. 相对路径 硬链接:原始文件相对路径是相对于当前工作目录 软链接:原始文件的相对路径是相对于链接文件的相对路径 7. 删除源文件 硬链接:只是链接数减一,但链接文件的访问不受影响 软链接:链接文件将无法访问 8. 文件类型 硬链接:和源文件相同 软链接:链接文件,和源文件无关 9. 文件大小 硬链接: 和源文件相同 软链接: 源文件的路径的长度
生产案例
案例1:提示空间满 No space left on device,但 df 可以看到空间很多,为什么?
假设你有一个文件系统,其总inode数为4194304个。当前已经使用了60830个inode,剩余可用的inode数量为4133474个。你尝试创建大量文件,直到inode耗尽。
1
2
3
4
5
6
[root@192 ~]# df Filesystem 1K-blocks Used Available Use% Mounted on /dev/mapper/openeuler-root 65617452 2570440 59681332 5% / [root@192 ~]# df -i Filesystem Inodes IUsed IFree IUse% Mounted on /dev/mapper/openeuler-root 4194304 60830 4133474 2% /
创建大量文件耗尽inode
假设你使用以下命令创建了大量文件:
1 for i in {1..4100000}; do touch /test/f$i ; done
中间状态
在创建过程中,inode逐渐被耗尽。假设你创建了大约3500000个文件后,inode使用情况如下:
1
2
3
[root@192 ~]# df -i Filesystem Inodes IUsed IFree IUse% Mounted on /dev/mapper/openeuler-root 4194304 3560830 633474 85% /
创建更多文件直到inode耗尽
继续创建文件,直到inode耗尽:
1 for i in {3500001..4100000}; do touch /test/f$i ; done
最终状态
当inode耗尽后,此时,df和df -i的输出可能如下:
1
2
3
4
5
6
[root@192 ~]# df -i Filesystem Inodes IUsed IFree IUse% Mounted on /dev/mapper/openeuler-root 4194304 4194303 1 100% / [root@192 ~]# df Filesystem 1K-blocks Used Available Use% Mounted on /dev/mapper/openeuler-root 65617452 2570440 59681332 5% /
此时,IUsed达到了4194303,IFree只剩下1,IUse%达到了100%。
/dev/mapper/openeuler-root的磁盘空间使用率仅为5%,还有大量的空间可用。
尝试创建新文件
此时,你尝试创建一个新文件:touch /test/newfile
你会收到以下错误:
1 touch: cannot touch '/test/newfile': No space left on device
结论:为什么会出现“No space left on device”?
尽管磁盘空间充足,但inode已经耗尽。每个文件和目录都需要一个inode来存储其元数据。当inode耗尽时,即使磁盘空间还有剩余,也无法创建新的文件或目录。因此,当你尝试创建新文件时,系统会报出“No space left on device”的错误。
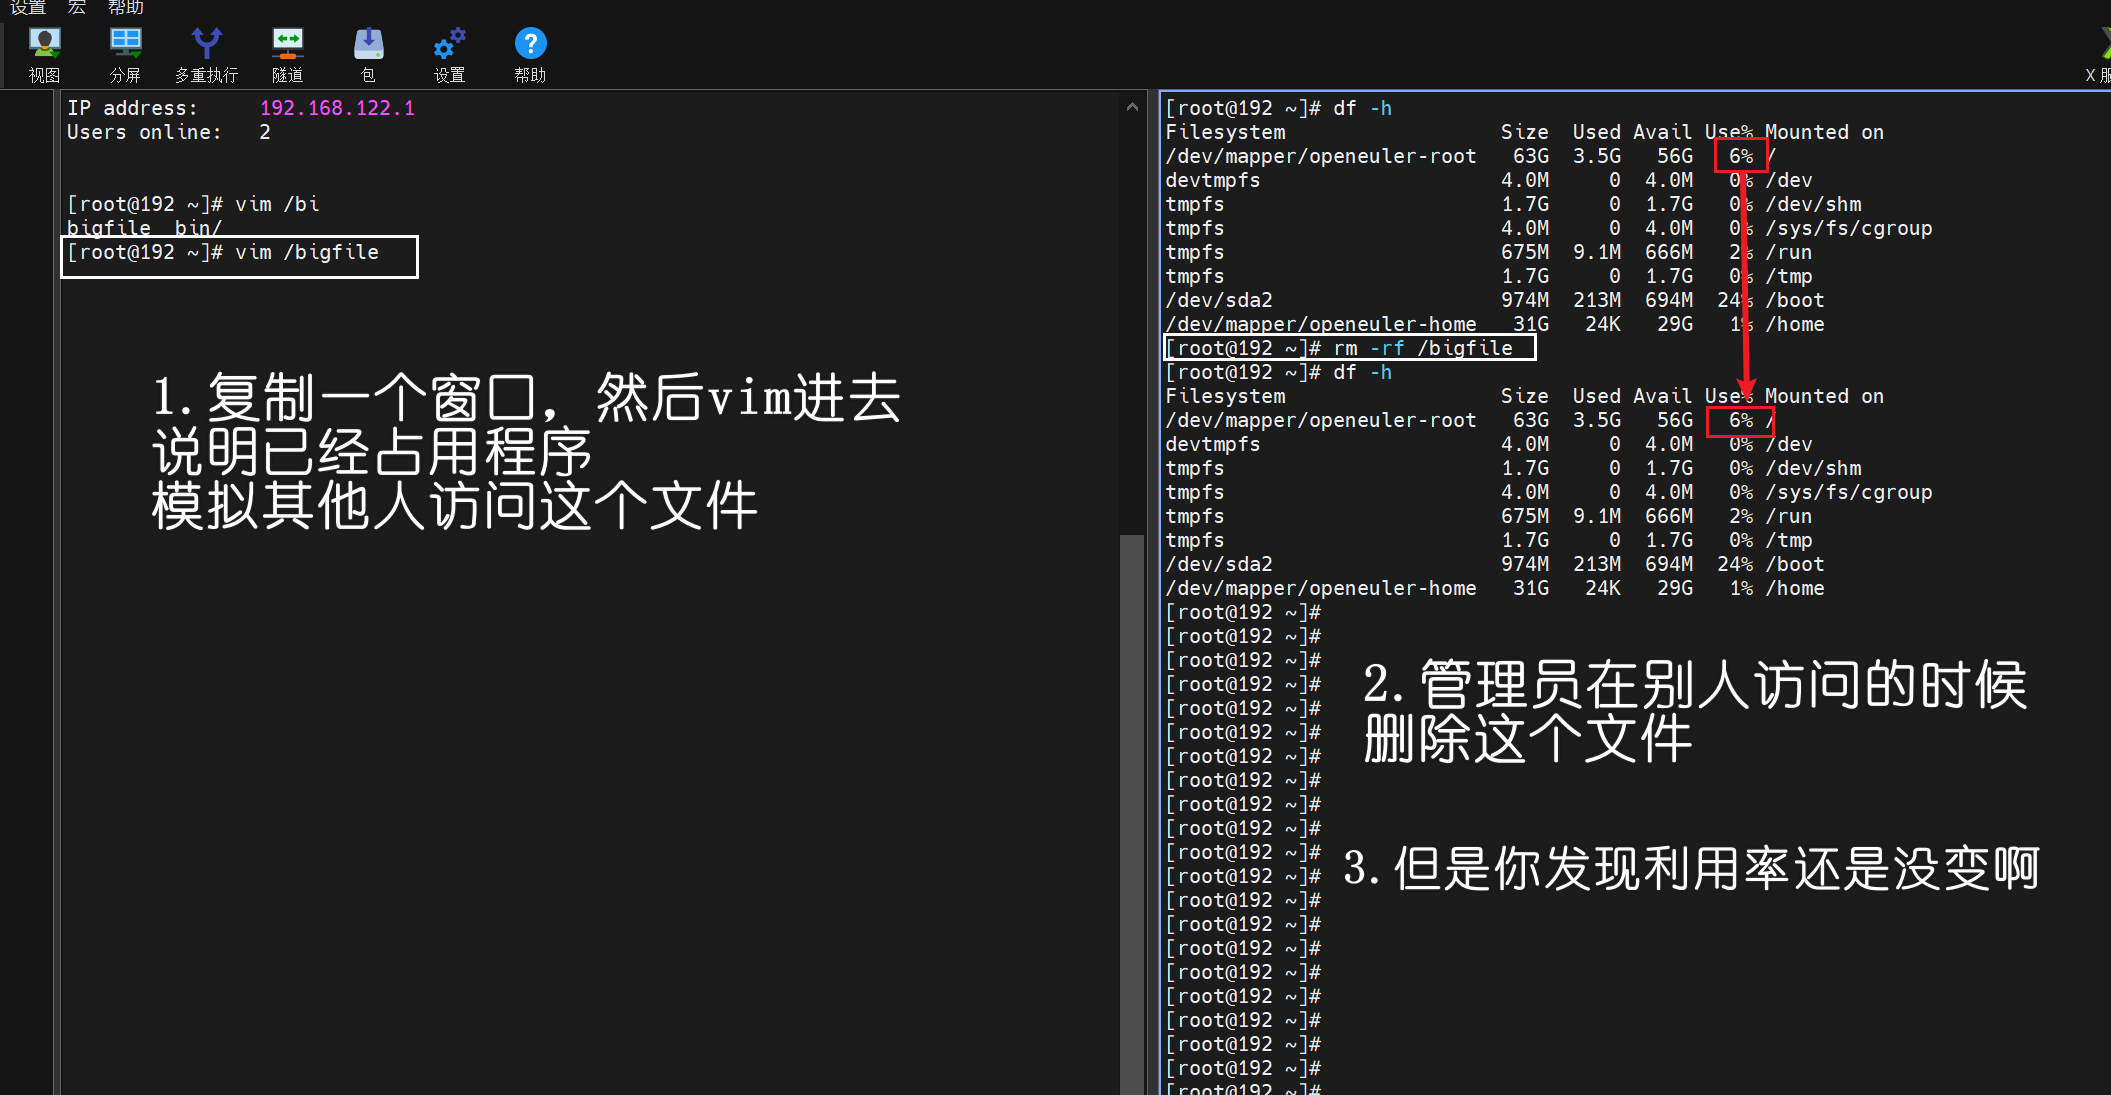
案例2:提示空间快满,使用 rm 删除了很大的无用文件后,df仍然看到空间不足,为什么?如何解决?
复现过程
查看df状态 利用率5%
1
2
3
[root@192 ~]# df -h Filesystem Size Used Avail Use% Mounted on /dev/mapper/openeuler-root 63G 2.5G 57G 5% /
创建一个大文件
1
2
3
4
[root@192 ~]# dd if =/dev/zero of=/bigfile bs=1G count=1 1+0 records in 1+0 records out 1073741824 bytes (1.1 GB, 1.0 GiB) copied, 0.622914 s, 1.7 GB/s
查看磁盘空间使用情况 利用率6%
1
2
3
[root@192 ~]# df -h Filesystem Size Used Avail Use% Mounted on /dev/mapper/openeuler-root 63G 3.5G 56G 6% /
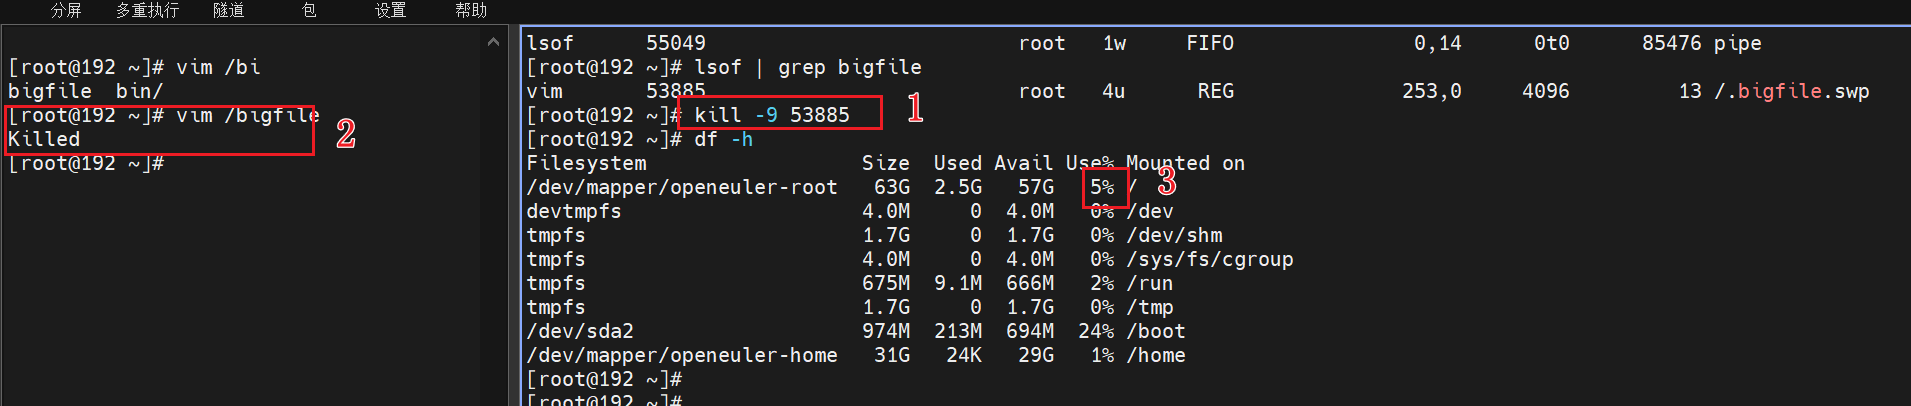
这时候复制一个窗口,vim进去
1 2 3 4 5 6 [root@192 ~]# lsof | grep bigfile vim 53885 root 4u REG 253,0 4096 13 /.bigfile.swp kill -9 53885
使用rm删除了很大的无用文件后,df仍然看到空间不足”的情况。原因是文件被某个进程占用,导致磁盘空间没有立即释放。通过查找并关闭占用文件的进程,可以解决这个问题。
IO 重定向和管道 标准输入和输出 程序:指令+数据
读入数据:Input
输出数据:Output
打开的文件都有一个fd: file descriptor (文件描述符)
Linux给程序提供三种 I/O 设备
标准输入(STDIN) -0 默认接受来自终端窗口的输入
标准输出(STDOUT)-1 默认输出到终端窗口
标准错误(STDERR) -2 默认输出到终端窗口
范例:文件描述符
1
2
3
4
5
6
7
8
9
10
11
12
13
14
15
16
17
18
19
20
[root@centos8 ~]#ll /dev/std* lrwxrwxrwx. 1 root root 15 Dec 16 08:56 /dev/stderr -> /proc/self/fd/2 lrwxrwxrwx. 1 root root 15 Dec 16 08:56 /dev/stdin -> /proc/self/fd/0 lrwxrwxrwx. 1 root root 15 Dec 16 08:56 /dev/stdout -> /proc/self/fd/1 [root@centos8 ~]#ll /proc/self/fd/* ls : cannot access '/proc/self/fd/255' : No such file or directorylrwx------. 1 root root 64 Dec 16 10:59 /proc/self/fd/0 -> /dev/pts/0 lrwx------. 1 root root 64 Dec 16 10:59 /proc/self/fd/1 -> /dev/pts/0 lrwx------. 1 root root 64 Dec 16 10:59 /proc/self/fd/2 -> /dev/pts/0 lr-x------. 1 root root 64 Dec 16 10:59 /proc/self/fd/3 -> /var/lib/sss/mc/passwd lrwx------. 1 root root 64 Dec 16 10:59 /proc/self/fd/4 -> 'socket:[66542]' lr-x------. 1 root root 64 Dec 16 10:59 /proc/self/fd/5 -> /var/lib/sss/mc/group [root@centos8 ~]#ll /proc/`pidof tail `/fd total 0 lrwx------. 1 root root 64 Dec 16 10:56 0 -> /dev/pts/1 lrwx------. 1 root root 64 Dec 16 10:56 1 -> /dev/pts/1 lrwx------. 1 root root 64 Dec 16 10:56 2 -> /dev/pts/1 lr-x------. 1 root root 64 Dec 16 10:56 3 -> /var/log/messages lr-x------. 1 root root 64 Dec 16 10:56 4 -> anon_inode:inotify
范例: 文件描述符
1
2
3
4
5
6
7
8
9
10
11
12
13
[root@centos8 ~]#cat test.txt hello [root@centos8 ~]#cat file.py import time f = open('test.txt' ,'r' ) time.sleep(1000) [root@centos8 ~]#python3 file.py [root@centos8 ~]#ll /proc/`pidof python3`/fd total 0 lrwx------ 1 root root 64 Apr 6 18:13 0 -> /dev/pts/0 lrwx------ 1 root root 64 Apr 6 18:13 1 -> /dev/pts/0 lrwx------ 1 root root 64 Apr 6 18:13 2 -> /dev/pts/0 lr-x------ 1 root root 64 Apr 6 18:13 3 -> /root/test.txt
I/O重定向redirect
I/O重定向:将默认的输入,输出或错误对应的设备改变,指向新的目标
标准输出和错误重新定向 STDOUT和STDERR可以被重定向到指定文件,而非默认的当前终端
格式
支持的操作符号包括
1
2
3
4
1> 或 > 把STDOUT重定向到文件 2> 把STDERR重定向到文件 &> 把标准输出和错误都重定向 >& 和上面功能一样,建议使用上面方式
以上如果文件已存在,文件内容会被覆盖
追加
>> 可以在原有内容基础上,追加内容
把输出和错误重新定向追加到文件
1
2
>> 追加标准输出重定向至文件 2>> 追加标准错误重定向至文件
标准输出和错误输出各自定向至不同位置
1 COMMAND > /path/to/file.out 2> /path/to/error.out
合并标准输出和错误输出为同一个数据流进行重定向
1
2
3
4
&> 覆盖重定向 &>> 追加重定向 COMMAND > /path/to/file.out 2>&1 (顺序很重要) COMMAND >> /path/to/file.out 2>&1
合并多个程序
(CMD1;CMD2…) 或者{ CMD1;CMD2;…; }合并多个程序的STDOUT
范例:
1
2
[root@centos8 ~]#ls 1> /dev/pts/1 [root@centos8 ~]#ls /data > /dev/pts/1
范例:标准错误重定向
1 [root@centos8 ~]#rm /data/f1.log 2> /data/all.log
范例:合并多个命令的结果至一个文件中
1
2
[root@centos8 ~]#( cal 2019 ; cal 2020 ) > all.txt [root@centos8 ~]#{ ls ;hostname;} > /data/all.log
范例:清除大文件
1 2 3 4 cat /dev/null > /data/file.log> /data/file.log
范例:分别重定向
1 [root@centos8 ~]#ls /data/ /xxx > stdout.log 2> stderr.log
范例:将标准输出和错误都重定向到同一个文件
1
2
3
4
5
[root@centos8 ~]#ls /data /xxx > /data/all.log 2>&1 [root@centos8 ~]#ls /data /xxx 2> /data/all.log 1>&2 [root@centos8 ~]#ls /data /xxx &> /data/all.log [root@centos8 ~]#ls /data /xxx >& /data/all.log [root@centos8 ~]#ls /data /xxx 2>&1 > /data/all.log
前四条命令 :
都是先处理标准输出或标准错误的重定向,然后再处理另一个流的重定向。
例如,ls /data /xxx > /data/all.log 2>&1先将标准输出重定向到文件,再将标准错误重定向到标准输出。
第五条命令 :
ls /data /xxx 2>&1 > /data/all.log先将标准错误重定向到标准输出,然后再将标准输出重定向到文件。这种顺序在某些情况下可能会导致不同的行为,尤其是在更复杂的命令中。但在这个特定的例子中,最终结果是相同的。
范例
1
2
3
[root@centos8 ~]#man bash > bash.txt [root@centos8 ~]#wc -l bash.txt 3821 bash.txt
范例
1
2
3
4
[root@192 ~]# passwd wang passwd: Unknown user name 'wang' . [root@192 ~]# passwd wang &> /dev/null [root@192 ~]#
范例: 实现标准输出和错误的互换
1
2
3
4
5
6
7
8
9
[root@centos8 ~]#ls f1.txt f2.txt ls : cannot access 'f1.txt' : No such file or directoryls : cannot access 'f2.txt' : No such file or directory[root@centos8 ~]#( cat /etc/centos-release /etc/xxx 3>&1 1>&2 2>&3 ) > f1.txt 2> f2.txt [root@centos8 ~]#cat f1.txt cat : /etc/xxx: No such file or directory[root@centos8 ~]#cat f2.txt CentOS Linux release 8.2.2004 (Core)
标准输入重定向 从文件中导入STDIN,代替当前终端的输入设备,使用 < 来重定向标准输入
某些命令能够接受从文件中导入的STDIN
tr 命令 tr 转换和删除字符
1 tr [OPTION]... SET1 [SET2]
1
2
3
4
5
6
7
8
9
10
11
12
13
14
15
16
17
18
19
20
21
22
23
24
-d --delete:删除所有属于第一字符集的字符 -s --squeeze-repeats:把连续重复的字符以单独一个字符表示,即去重 -t --truncate-set1:将第一个字符集对应字符转化为第二字符集对应的字符 -c –C --complement:取字符集的补集 \NNN character with octal value NNN (1 to 3 octal digits) \\ backslash \a audible BEL \b backspace \f form feed \n new line \r return \t horizontal tab \v vertical tab [:alnum:]:字母和数字 [:alpha:]:字母 [:digit:]:数字 [:lower:]:小写字母 [:upper:]:大写字母 [:space:]:空白字符 [:print :]:可打印字符 [:punct:]:标点符号 [:graph:]:图形字符 [:cntrl:]:控制(非打印)字符 [:xdigit:]:十六进制字符
范例:
1 2 3 4 5 6 7 8 9 10 11 12 13 14 15 [root@192 ~]# cat /etc/issue Authorized users only. All activities may be monitored and reported. [root@192 ~]# tr a-z A-Z< /etc/issue AUTHORIZED USERS ONLY. ALL ACTIVITIES MAY BE MONITORED AND REPORTED. [root@192 ~]# [root@192 ~]# echo "acvsfasdfSDFD21343243" > 1.txt [root@192 ~]# cat 1.txt acvsfasdfSDFD21343243 [root@192 ~]# tr -d abc < 1.txt vsfsdfSDFD21343243 [root@192 ~]#
范例:将所有的连续空格替换成一个空格或别的符号
1
2
3
4
5
6
7
8
9
10
11
12
13
14
15
16
17
18
19
20
21
22
23
24
25
26
27
28
29
30
31
[root@192 ~]# df -h Filesystem Size Used Avail Use% Mounted on /dev/mapper/openeuler-root 63G 2.5G 57G 5% / devtmpfs 4.0M 0 4.0M 0% /dev tmpfs 1.7G 0 1.7G 0% /dev/shm tmpfs 4.0M 0 4.0M 0% /sys/fs/cgroup tmpfs 675M 9.1M 666M 2% /run tmpfs 1.7G 0 1.7G 0% /tmp /dev/sda2 974M 213M 694M 24% /boot /dev/mapper/openeuler-home 31G 24K 29G 1% /home [root@192 ~]# df -h > df.log [root@192 ~]# tr -s ' ' < df.log Filesystem Size Used Avail Use% Mounted on /dev/mapper/openeuler-root 63G 2.5G 57G 5% / devtmpfs 4.0M 0 4.0M 0% /dev tmpfs 1.7G 0 1.7G 0% /dev/shm tmpfs 4.0M 0 4.0M 0% /sys/fs/cgroup tmpfs 675M 9.1M 666M 2% /run tmpfs 1.7G 0 1.7G 0% /tmp /dev/sda2 974M 213M 694M 24% /boot /dev/mapper/openeuler-home 31G 24K 29G 1% /home [root@192 ~]# tr -s ' ' : < df.log Filesystem:Size:Used:Avail:Use%:Mounted:on /dev/mapper/openeuler-root:63G:2.5G:57G:5%:/ devtmpfs:4.0M:0:4.0M:0%:/dev tmpfs:1.7G:0:1.7G:0%:/dev/shm tmpfs:4.0M:0:4.0M:0%:/sys/fs/cgroup tmpfs:675M:9.1M:666M:2%:/run tmpfs:1.7G:0:1.7G:0%:/tmp /dev/sda2:974M:213M:694M:24%:/boot /dev/mapper/openeuler-home:31G:24K:29G:1%:/home
标准输入重定向 实现标准输入重定向的符号
1
2
COMMAND 0< FILE COMMAND < FILE
比如
1
2
3
cat > filemage wangxiaochun
按ctrl+d离开,可以使用文件来代替键盘的输入
1
2
cat < file1 > file2 cat < file1 >> file1
范例:
1
2
3
4
5
6
7
8
9
10
11
12
13
14
15
16
17
18
19
20
21
22
23
[root@centos8 ~]#echo 2^3 > bc.log [root@centos8 ~]#cat bc.log 2^3 [root@centos8 ~]#bc < bc.log 8 [root@centos8 ~]#cat < mail.txt hello how old are you [root@centos8 ~]#cat mail.txt hello how old are you [root@centos8 ~]#cat < mail.txt > mail2.txt [root@centos8 ~]#cat mail2.txt hello how old are you [root@centos8 ~]#cat mail.txt hello how old are you [root@centos8 ~]#mail -s test2 wang < mail.txt [root@centos8 ~]#cat > cat.log line1 line2 line3
把多行重定向 使用 “<<终止词” 命令从键盘把多行重导向给STDIN,直到终止词位置之前的所有文本都发送给
1
2
3
4
5
cat > 1.txt <<"EOF" 213123 123213 41324324 EOF
高级重定向写法 cmd <<< "string"
含义是 here-string ,表示传给给cmd的stdin的内容从这里开始是一个字符串。
范例:
1
2
[root@rocky8 ~]#tr 'a-z' 'A-Z' <<<"I am wang" I AM WANG
cmd1 < <(cmd2)
名称为 Process substitution ,是由两个部分组成
<(cmd2) 表示把cmd2的输出写入一个临时文件, 注意:<和(之间无空格
cmd1 < 这是一个标准的stdin重定向
把两个合起来,就是把cmd2的输出stdout传递给cmd1作为输入stdin, 中间通过临时文件做传递
1
2
3
4
[root@rocky8 ~]#tr 'a-z' 'A-Z' < <(echo I am wang) I AM WANG [root@192 ~]# ll <(echo whoami ) lr-x------ 1 root root 64 Jul 2 16:53 /dev/fd/63 -> 'pipe:[99822]'
管道 管道 管道(使用符号“|”表示)用来连接多个命令
格式
功能说明:
将命令1的STDOUT发送给命令2的STDIN,命令2的STDOUT发送到命令3的STDIN
所有命令会在当前shell进程的子shell进程中执行
组合多种工具的功能
注意:STDERR默认不能通过管道转发,可利用2>&1 或 |& 实现,格式如下
1
2
命令1 2>&1 | 命令2 命令1 |& 命令2
范例
1
2
3
4
5
6
7
8
9
10
11
12
13
14
15
16
17
18
19
20
21
22
[root@192 ~]# df -h > df.log [root@192 ~]# tr -s ' ' < df.log Filesystem Size Used Avail Use% Mounted on /dev/mapper/openeuler-root 63G 2.5G 57G 5% / devtmpfs 4.0M 0 4.0M 0% /dev tmpfs 1.7G 0 1.7G 0% /dev/shm tmpfs 4.0M 0 4.0M 0% /sys/fs/cgroup tmpfs 675M 9.1M 666M 2% /run tmpfs 1.7G 0 1.7G 0% /tmp /dev/sda2 974M 213M 694M 24% /boot /dev/mapper/openeuler-home 31G 24K 29G 1% /home [root@192 ~]# df -h| tr -s ' ' Filesystem Size Used Avail Use% Mounted on /dev/mapper/openeuler-root 63G 2.5G 57G 5% / devtmpfs 4.0M 0 4.0M 0% /dev tmpfs 1.7G 0 1.7G 0% /dev/shm tmpfs 4.0M 0 4.0M 0% /sys/fs/cgroup tmpfs 675M 9.1M 666M 2% /run tmpfs 1.7G 0 1.7G 0% /tmp /dev/sda2 974M 213M 694M 24% /boot /dev/mapper/openeuler-home 31G 24K 29G 1% /home
范例:
1
2
3
4
5
6
7
8
9
10
11
12
13
14
15
16
17
18
19
20
21
22
23
24
25
26
27
28
29
30
[root@centos8 ~]#ls /data /xxx | tr 'a-z' 'A-Z' ls : cannot access '/xxx' : No such file or directory/DATA: ALL.LOG F1.TXT PASSWD.LOG STERR.LOG STOUT.LOG TEST.LOG TOUCH.LOG [root@centos8 ~]#ls /data /xxx 2>&1 | tr 'a-z' 'A-Z' LS: CANNOT ACCESS '/XXX' : NO SUCH FILE OR DIRECTORY /DATA: ALL.LOG F1.TXT PASSWD.LOG STERR.LOG STOUT.LOG TEST.LOG TOUCH.LOG [root@centos8 ~]#ls /data /xxx |& tr 'a-z' 'A-Z' LS: CANNOT ACCESS '/XXX' : NO SUCH FILE OR DIRECTORY /DATA: ALL.LOG F1.TXT PASSWD.LOG STERR.LOG STOUT.LOG TEST.LOG TOUCH.LOG
范例:
1
2
3
4
5
6
7
8
9
10
11
12
13
14
15
16
17
18
19
20
21
22
23
24
25
[root@192 ~]# useradd wang [root@192 ~]# passwd --stdin wang Changing password for user wang. 123456 passwd: all authentication tokens updated successfully. [root@192 ~]# cat > pass.txt<< "EOF" 123456 EOF [root@192 ~]# passwd --stdin wang < pass.txt Changing password for user wang. passwd: all authentication tokens updated successfully. [root@192 ~]# cat pass.txt | passwd --stdin wang Changing password for user wang. passwd: all authentication tokens updated successfully. [root@192 ~]# echo 123456 | passwd --stdin wang Changing password for user wang. passwd: all authentication tokens updated successfully. [root@192 ~]# echo 123456 | passwd --stdin wang &>/dev/null [root@192 ~]#
范例:
1 2 3 4 5 6 7 8 ls | tr ‘a-z’ ‘A-Z’ls -l /etc | lessecho "test email" | mail -s "test" wang@example.comecho "2^3" |bc
范例:
1
2
3
[root@rocky8 ~]#ls --help | grep size [root@rocky8 ~]#mysqldump --help |& grep master-data
tee 命令 利用 tee 命令可以重定向到多个目标,经常配合管道符一起使用
格式
1 命令1 | tee [-a ] 文件名 | 命令2
以上可以把命令1的STDOUT保存在文件中,做为命令2的输入
选项:
功能:
保存不同阶段的输出
复杂管道的故障排除
同时查看和记录输出
范例
1
2
3
4
5
6
7
8
[root@centos8 ~]#echo {1..100}|tr ' ' +|bc 5050 [root@centos8 ~]#echo {1..100..2} | tr ' ' + | bc 2500 [root@centos8 ~]#seq -s + 1 100 |bc 5050 [root@centos8 ~]#seq -s+ 1 2 100 | bc 2500
范例:
1
2
3
4
cat <<EOF | tee 2.txt welcome to magedu happy new year EOF
1
2
3
4
5
6
7
[root@192 ~]# cat <<EOF | tee 2.txt welcome to magedu happy new year EOF welcome to magedu happy new year [root@192 ~]#
范例
1
2
3
4
5
6
7
8
9
10
11
12
13
14
15
16
[root@192 ~]# tee 3.txt >/dev/null <<"EOF" welcome to magedu happy new year welcome to magedu happy new year welcome to magedu happy new year EOF [root@192 ~]# cat 3.txt welcome to magedu happy new year welcome to magedu happy new year welcome to magedu happy new year [root@192 ~]#
千屹博客旗下的所有文章,是通过本人课堂学习和课外自学所精心整理的知识巨著


 微信
微信 支付宝
支付宝